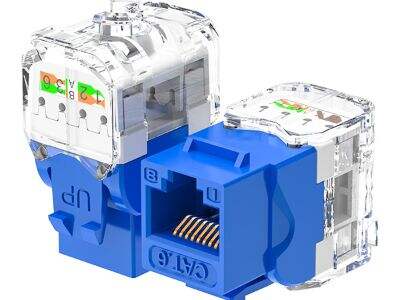
So, you want your wall plates to look neat and clean? Today, with Hy-connect’s help, I will walk you through step by step on how to install hy-connect Keystone Jack in wall plates. Take time and follow along — This guide is intended to walk you through the process step-by-step without difficulty, so take your time and do it in an orderly manner.
Step 1: Gather Your Materials
The First Step is Preparation: Before You Start The type of connector you need is known as a Keystone Jack, which is used to connect cables. At this point, you also need a Wall Plate, a flat piece covering the place the wires came out of. You will also need a Screwdriver and Wire Strippers. To pick these up at any local hardware store. Check to make sure you have everything before you start, so you won’t need to interrupt your project midway through.
Step 2: Get the Wall Plate Ready
With your materials ready, let's get the wall plate ready. Remove old Keystone Jacks from the wall plate. Remove the Plate To be sure that there is dirt or dust on the wall plate, clean it so it should be nice and smooth. The new Key Stone Jack will look and work better on a clean wall plate.
Step 3: Route Keystone Jack
Then, remove the Keystone Jack from its packaging. To make sure it is safe, it is often wrapped up. Check out the rear of the hy-connect keystone cat6 jack for labels or instructions on how to wire it. These labels matter a lot, as they tell you where to connect each wire. Do be sure to read them closely so you know what to do when you reach that point.
Step 4: Strip the Wires
Now we need to get the wires ready. You must remove approximately 1 inch of the outer insulation from the ends of the wires you will insert into the openings of the Keystone Jack using the Wire Strippers. This will display the colorful wires inside. Be cautious when using the wire strippers, so as not to slice the inner wires. You want to show them to the light but not destroy them.
Step 5: Insert Wires
When your wires are ready, it’s time to insert them into the Keystone Jack. Insert each wire into the appropriate slot within the Keystone Jack. And don’t forget the little labels on the back to identify the correct location for each wire. This ensures that the wires fit tightly and do not touch each other, which would create issues later on. Spend time to make sure they are seated in the right position.
Step 6: Punch Down the Wires
First of all, once you have inserted all the wires, you need to secure them. For this stage, it helps to use a punch down tool. The punch down tool will push the wires down deep into the Keystone Jack to ensure that they stay in place. Spread down evenly, but be cautious not to press hard. You can clip off any excess wire that is protruding with scissors or wire cutters.
How to Connect to the Wall Plate: Step 7
After the wires are inserted correctly into the Keystone Jack, it is now time to connect them to the wall plate. Insert the Keystone Jack into the wall plate cautiously and align the pins to ensure a proper fit. Using your screwdriver, tighten the screws on the wall plate to hold the Keystone Jack firmly in place. Make sure it feels secure but don’t over-tighten the screws.
Step 8: Test the Connection
Now that everything is tight and secure, it’s time to put your work to the test! The other end may lead to your computer or gaming console, so you can plug in an Ethernet Cable to the Keystone Jack. Verify that the connection is working. If it does, congratulations! Congratulations, you have just successfully installed a Keystone Jack into a wall plate!
You have been great unskilled workers by improving the inner appearance of your house or office by following these simple steps. Keystone Jacks are easy to install into wall plates and can be done by anyone. It just takes a few tools and some attention to detail. We hope this guide will help you to install your hy-connect keystone jack with confidence and ease!
Thank you for reading and enjoy your DIY projects with Hy-connect! Keep in mind, it takes practice so go out there and explore. Happy DIYing!

 EN
EN
 AR
AR
 BG
BG
 HR
HR
 CS
CS
 DA
DA
 NL
NL
 FI
FI
 FR
FR
 DE
DE
 HI
HI
 IT
IT
 JA
JA
 KO
KO
 NO
NO
 PL
PL
 PT
PT
 RO
RO
 RU
RU
 ES
ES
 SV
SV
 TL
TL
 ID
ID
 LV
LV
 VI
VI
 HU
HU
 TH
TH
 TR
TR
 FA
FA
 GA
GA
 CY
CY
 BE
BE
 HY
HY
 AZ
AZ
 BN
BN
 LA
LA
 MN
MN
 UZ
UZ
 HAW
HAW
 XH
XH

